Friday, February 17, 2012

Discovery Bottles

 My first stashbusting project centered on using up baby food jars I had saved from when Bug had been eating baby food.  I have quite a few more jars  as well- we"ll have to see what they become.

Bug and I made a few discovery bottles/jars using materials we had in our stash.  The only thing I had to purchase was corn syrup, which gave us another fun bottle to fill as well!
Back Row: Red glitter and beads in a 50/50 mix of water and corn syrup
                  ABC I-Spy-Multicolor glitter, star confetti, and alphabet beads in a 50/50 mix of water and corn syrup
                 Color/Shape I-Spy- Various items focusing on colors and shapes in rice (I used pattern blocks, balloon confetti pieces, and colorful mini clothespins) 

Middle Row: Star confetti in water and blue food coloring (we think it looks like a starry night sky :)
                      Dish soap in water with red food coloring, only fill it halfway with water- leave the rest of the room for the bubbles!
                      Pom poms and little jingle bells

Front Row:  Just plain old rice in the first and buttons in the second :)

Stashbusters

 Sorry it got quiet around here.  I've been a little busy :) .


Courtesy of Sir Eats-A-Lot and the Princess of Wails.


They've been keeping my sleep deprived self on my toes lately.  Between the baby's growth spurt and the normal nearly 3 year old drama I haven't had as much time to be crafty. Baby bear is going to be 7 weeks old on Monday.  I can't believe how fast time is flying.

As for other news, in my efforts to be thrifty I have made a solemn vow not to go to Joann's or Michael's or Hobby Lobby or the crafty aisle at Walmart unless I am in dire need of a certain supply for a certain project.  It's ok, because I already have a ridiculous amount of crafting supplies in my stash.  Things that I just loved and HAD to have, things that I found a really great deal on and couldn't resist, leftovers from other projects... you get the picture.  So I am STASHBUSTING!  When I come across a project I would like to do, I must make every effort I can to use things I already have.  As Tim Gunn might say, "Make it work!"  I'll let you know when I've done a stashbusting project, and if your supply stash is just begging to get pulled out of the closet please join me!


Wednesday, February 1, 2012

Angry Birds Anonymous


We're a bit behind the times, as we don't have smart phones.  We just got a Roku player for our TV that included the Angry Birds game, and we are all quite addicted.  I remembered the plush tutorials on Obsessively Stitching and thought I would bring the game to life for Bug :)

  
 Less screen time, more family time. We love it!
 This is what I got when I asked them to smile for me :)

Monday, January 30, 2012

Super Mario Templates


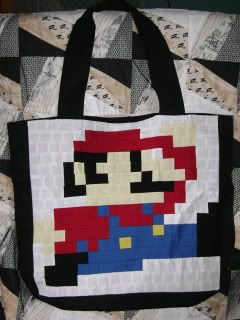
A while back I made a present for a friend who happens to be a Super Mario Bros. nut.  I came up with this pixelated Mario tote bag.  Each little square is one inch sewn.  I am also a bit of a Super Mario Bros. fan, so I had a hard time gift wrapping it and sending it off :)

I made up a few templates when I was deciding what image to go with for her bag, and I thought I would share the templates I made up in case anyone else wanted to try it out.  There is Mario, a Mushroom,  a Goomba, and a Fire Flower.

Super Mario Bros. Templates

Of course this isn't limited to tote bags, you can make quilts, pillows, backpacks, messenger bags, whatever you can think of! I used a spreadsheet program (excel) to create my templates using game images found on google.  If you would like to create your own template of a special character open up a spreadsheet and start filling in colors!

The technique is quite easy, yet very time consuming.  The product- so worth it!  I did not take pictures when I made this, but I will list out the steps I followed.  I used quilting cottons that were 42" wide.

1. Cut your fabric into 1.5" strips.  Follow the template for the number of strips to cut of each color
2. Mark your strips.  I did not cut hundreds of little individual squares.  I marked out the seam allowance with a fabric marker so I could sew the sections of the same color together more easily. I used 1/4" seam allowance so the pattern went like this:  1/4" 1" 1/2" 1" 1/2"...
3. Cut and sew your strips to match the horizontal strips in the template. I went by each color.  Pinch the 1/2" of seam allowance and sew down to make your seam, repeat until you have the number of squares necessary for your section.  To cut your long strip into sections, find the 1/2" seam allowance and cut in half so there is 1/4" on each side of the 1" square.
4. Sew the sections into horizontal strips, following the template.
5. Press down the seams.
6. Sew the horizontal strips together.
7.  Press the seams again.
Voila!

Friday, January 27, 2012

T-Shirt Quilts

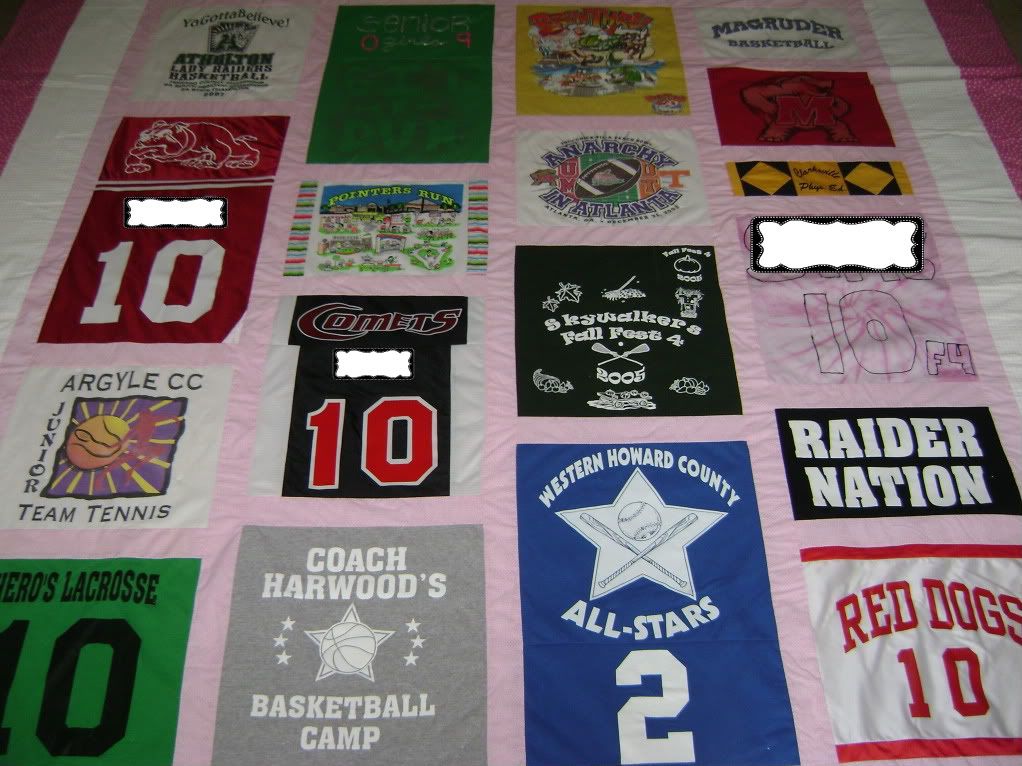
T-shirt quilts are becoming a popular trend again, especially since there was a t-shirt quilt featured in The Twilight Saga: Eclipse. I've made quite a few, (even before they got popular again) and wanted to share pictures of a few of them and give some ideas on fun/non-traditional elements to add to the quilts.

 I make and sell t-shirt quilts as a side job.  Most of the time parents find me when their children are graduating high school or college.  These quilts are a great way to preserve our memories and the core parts of our lives before we expand our horizons in college or the workforce.

 
(I blocked out her name on the jerseys to protect her privacy a bit)

This quilt was for a soccer player, and was one of my favorite quilts to make because they gave me lots of unconventional materials to work with.
 The skirt of her school uniform, which was way cool with all the pleating and the button detail.  I backed the skirt with fusible interfacing so that the pleats would stay where I put them while I was sewing on the sashing.
 Her goalie jersey and gloves!  I took out the spines in the gloves and hand stitched them onto the square.  That was a labor of love :)  The glove materials is quite thick, but how awesome to have her gloves as a keepsake on a quilt.
 I had a little bit of "leftover" space and didn't have a t-shirt to fill it, so I appliqued on a soccer ball with a net overlay.  The square next door featured a fun hat that flowed over from it's designated space, the points of the hat are hand-tacked down to the quilt.

All these purple quilts :)  This one is more traditional (and the photo was taken of the top before making the quilt sandwich).

This is my sister's t-shirt quilt.  She had A LOT of t-shirts that she wanted to include, and it was one of my first quilts.  We didn't know better, so we made it KING size, not fully understanding quite how large that would be.  I couldn't even fit the whole quilt in a picture when we were photographing it in her room.  She hopes one day to have a wall large enough to hang it on :)
 She had quite a few things that either were not graphics on t-shirts, but she wanted to use the fabric.  To make them visually appealing, we paged through quilting books to find ways to use the fabric.  This square was made from the outfit she wore performing when her chorus group took a trip to Disney World.  We both drove an old maroon van, so the choice of the van was also sentimental and incorporating another memory.
 This square was made with her outfit from prom.
 The sleeves of her Pathfinder uniform.  (Pathfinders is like Boy/Girl Scouts for Seventh Day Adventists).
 I love this purple material we picked out, it fits my sister's personality perfectly.


Tuesday, January 24, 2012

Activity Gym

 This activity has been on my list of sewing projects since like June, I finished gathering materials in August, and I just now got around to sewing it up.   I used this Activity Gym tutorial.
 I love how soft the minky is, even though it is so stretchy that the edges started curling when I topstitched.  I think Bug likes it more than baby bear at this point :)
 And just because she is too cute :)


Sunday, January 22, 2012

Baby Boy Sewing Projects


I love sewing for my girl. Dresses, skirts, ruffles, bows, I love it all (in any color except pink). But I did get awfully jealous of people that had little boys to sew for as well, especially when Dana and Rae put on the Celebrate the Boy series. When I found I had a little boy to sew for in August I was THRILLED and couldn't wait to get started on some little boy clothes and diapers. I still have my one size pocket diapers that I used with Bug, so I was just updating my diaper stash a little bit.

1 newborn fitted from the free Darling Diapers Unlimited pattern, 5 newborn all in 2's from the LaDiDa pattern, 4 one size pocket diapers from the LaDiDa pattern, and 1 one size pocket diaper from my own pattern.


These are all wool longies meant to be used as diaper covers. They are all made from the free Katrina longies pattern. I used wool sweaters I thrifted to make them. These first 3 pairs are newborn size, they are so itty bitty! Nate has pretty much outgrown them now, but they fit for about 2 weeks.


Size smalls


Size mediums

12 fitted diapers made from the precut kits sold here at wazoodle.com. I actually love the fit of these, although the absorbency could be a little better. I'm thinking about ordering a kit for a dozen mediums. It was really nice not to have to cut out all the pieces, they went together very quickly.

Infant Lap Tees, as seen on my tutorial. The tees started getting a little snug at a little over 10 pounds for him, perhaps his broad shoulders were part of the problem :)


Pants!! I used a pattern from an Ottobre magazine for these pants. I love how professional they look, they've got so many cute little details. They seem to be a bit big for the 0-3 month size range that they were meant for though.

Vests!! I love these adorable little vests, the second one is made out of organic bamboo fleece and is sooo soft and yummy. Again, from an Ottobre magazine pattern.

These shirts are my favorite part. I got to use all of the adorable knits that I was using in things for friends with boys and for my etsy shop. It was very satisfying to be able to use them for myself :) Also made using an Ottobre pattern.


Hopefully the outfits will fit him soon, then I can share pictures of the clothes on a baby, much more gratifying and infinitely more adorable!