Thursday, October 31, 2013

Quiet Books: Busy Bug Style

I started making quiet books about a year ago, as Christmas gifts for Natalie and my daycare girls.

I gleaned my ideas from all over the internet and stored them on my pinterest board.  I searched for templates and just plain adorable pages that covered a variety of skills and came up with 8 pages that would make for a fun quiet book.


I attached them to a cover using grommets and binder rings so that I could easily add more pages and take out pages that had they had outgrown or grown tired of.

This year I've made a few more pages to add to their books and made a book for another one of my daycare girlies.

I'll go through the pages I made, list any templates I used, and share a few of my tips and tricks that came in handy when designing my books.  I did not include any information on my book covers.  A tutorial will be coming on that separately since I still need to make a cover for Sadie's pages.  Quiet Book Cover Tutorial HERE.

I relied heavily on my cricut when I was designing my pages.  I used the Sure Cuts A Lot 2 program which allows me to cut the images I create in the program without relying on a variety of cartridges.

My pages are 10" x 12" finished, so I was able to design effectively on the area of a 12 x 12 cutting mat.  It was very helpful to use the program because it was easy to make plans and make changes without committing or spending a ton of time hand drafting.  It also made cutting the patterns a lot faster and more precise.  It was easy to use the measurements to make PDF templates of the when they were perfected.


The first page has their names with snap on letters, and button up flowers in a vase.  I was inspired by this page and this page.  I found a nice chunky font and made sure that the names were no more than 9" or so wide and 4 inches tall.  The flower is about 2" in circumference and I just added a buttonhole that fit the size of my buttons instead of cutting the hole in the center of the image.  I hand drafted the vase, it is about 2" tall and 2" wide with a little shaping to make it vase like.


 This is an example of  how I was able to plan on the Sure Cuts A Lot program, you can see how the grids can help and how plans changed for how large the different names were depending on how many letters are in the name.


The second page is a dress up girl and closet to keep her clothes.  I found the template for the girl and the clothes here.  The closet is a 8"x 4" rectangle cut in half. I used regular felt for Natalie's page, and then stiff felt for the lastest page that I did.  The stiff felt is definitely much better!


Page 3 is a washing machine and clothesline page with a color matching game included with the socks.  Here is the template.  I found the inspiration for this page here and here.


Page 4 is all about numbers 1-10.  As a teacher, I taught Touch Math to my students and it really helps with addition and subtraction for young mathematicians.  I added buttons to touch points to teach touch points and help the children match a quantity to the numeral.  The numbers can be stored in the pocket and velcro sticks them on the page.  Template here.  To make the pocket, fold over the top edge of the fabric 1/4" and then fold it over again about 1/2" and sew to make a casing for the elastic.  Sew the elastic into the casing and then get ready to place the pocket on the page.  You will want to fold the edges under 1/4" on the other 3 sides and pin, adding a few pleats on the bottom of the pocket to accommodate the extra length. Finally, sew down all 3 sides.


The fifth page was inspired by an ice cream patterning activity that I found when making busy bags for my kids.  I added the menu/counter pockets to store the pieces to the game.  Here is a template for the shop portion of the page.  I wrote out the signs using an ultra fine tip sharpie.


This page was inspired by a cupcake building busy bag game and I turned into a cupcake bakery page.  The cupcake game can be found here. The pieces are stored in the pocket behind the oven.  I was inspired by this oven, but thought the cupcake building was more fun than have premade cupcakes.


It didn't really make sense to make a template for this page since it is all rectangles that are too large to print on a letter size sheet of paper.  Here are the basic dimensions for the oven.  The black glitter felt is 8 3/4" wide x 9" tall and sewn on 3 sides, leaving the top open to be used as a pocket.  The oven door started as 2 8 3/4" x 9" rectangles and a piece of vinyl (this vinyl was from a duvet cover bag) cut to the same size.  I layered all 3 rectangles together and used a paper template cut to 6 1/2" wide x 6" tall to place the oven window and sewed around the edges of the paper template.  I centered the template width wise, but placed it just 3/4" up from the bottom to leave room on the top to accommodate the handle. After I sewed around all 4 edges of the template I trimmed out the blue and white felt from the center and trimmed the excess vinyl from the outside edges of the window. Finally I sewed around the outer edges and added the velcro and the ribbon handle. The oven door opens and closes with velcro in the top corners.


The sixth page is a lacing page/tying page, but has been different for all the books I have done.  Natalie has a basic, converse style shoe to lace and tie using some fun fabrics.  I did a football cleat for another girl that is a Raven's fan.  For my monster loving daycare girl, I made a fuzzy monster that has a vest to lace and tie. Sorry, no templates for the shoes or monster.  I modified my shoe pattern from this one.


The latest page I did omits the lacing and just focuses on tying the bow for the ball gown.  Template for the dress here.


The seventh page is a weaving task.  I did a "weave the blanket" page for the first few books.


Then I saw this "weave a pie crust" page and had to do my own version!  So cute and less intimidating for the kids than the weave a blanket page.  Template for pie weaving page here.


Page 8 is a barn with farm animal finger puppets designed by Homemade by Jill.  I modified it by making the door a zippered pocket to hold the farm animal puppets.

This year I have made a few new pages to add to Natalie's book and my monster lover's book. They are a whole year older and could use a few new challenges!

This page is inserted after page 4 as a follow up to numbers 1-10.  The bead strings show place value for the tens and ones columns and numbers 11-20 snap on and off.  They can also be stored in the pocket with numbers 1-10.  Template here.


On the other side of that page is a clock face with movable hands and a zippered pocket with cards to show digital representations of the analog time shown on the clock.  Template here with black number cards. Template here for colored number cards. There are grommets on the hands just like the grommets on the pages themselves so they move quite freely under the button.


Next comes a Marble Maze!  I saw a few ideas out there, but the mazes were not very fun so I made up my own to keep up with my 4 year old daughter.  The fact that the hubby played with it for a full 10 minutes figuring out all the different paths he could take to get to the end tells me I get a thumbs up : D   Template here.  Cut the fabric to 9" x 11.5" and fold the edges under 1/4" on all sides when sewing onto the page.  Don't forget to put in the marble before you close the last side!  Then embroider the maze on the fabric using embroidery floss.  I couldn't seem to get the orange to pop on camera as it does in real life :(


On the back side of that is what may be my favorite page ever, a mailbox with ADORABLE letters and envelopes to send in the mail.  I found the template here.


One of Natalie's favorite new games to play is tic tac toe, so I included a board and playing pieces stored in the pocket. Template here.  The pocket is constructed in the same manner as the pocket on the numbers 1-10 page.


On the back side of that page is an I-SPY bag that snaps out for I-SPY fun.  It is a rather noisy page for a quiet book, but is quite fun :)  There are great tutorials for I-SPY bags all over blogland, here is one that I like.


I know these books are on the girly side....because all of the books I have made are for girls!  I will be diving into some more boyish pages soon, I'm hoping to finish a quiet book for Nathan's 2nd birthday featuring trucks, tractors, trains, and other things that go.

I hope you enjoy my quiet book goodies and are inspired to make your own!


Wednesday, October 23, 2013

Tutorial: Recover or Customize Your Baby Carrier

Babywearing is one of my favorite things.  I have actually made several of my own carriers using various tutorials all over the internet.  An option that many new parents are choosing is the market for soft structured carriers like the Ergo, Beco, Boba, and more.  There are so many options out there, and they are often pricy.  Chances are the cuter the carrier is, the more you will spend, but what about those DIY souls who don't want to break the bank but still want a cute carrier?  This tutorial is for you.  Please pardon the camera phone photos, it was the best that was going to happen that day :)

One of my friends found a used Beco Butterfly II that she bought at a great price, but it was covered in a peeling Moose Argyle print that she did not want to keep.  She asked for some help updating and recovering the front panel, and I was glad to assist.

Word of Caution:  Baby carriers are made to be structurally sound in order to hold something as precious as a small child.  Ripping out seams can compromise the integrity of your carrier and I do not recommend removing the fabric panels that are original to the carrier or ripping any seams on the carrier.


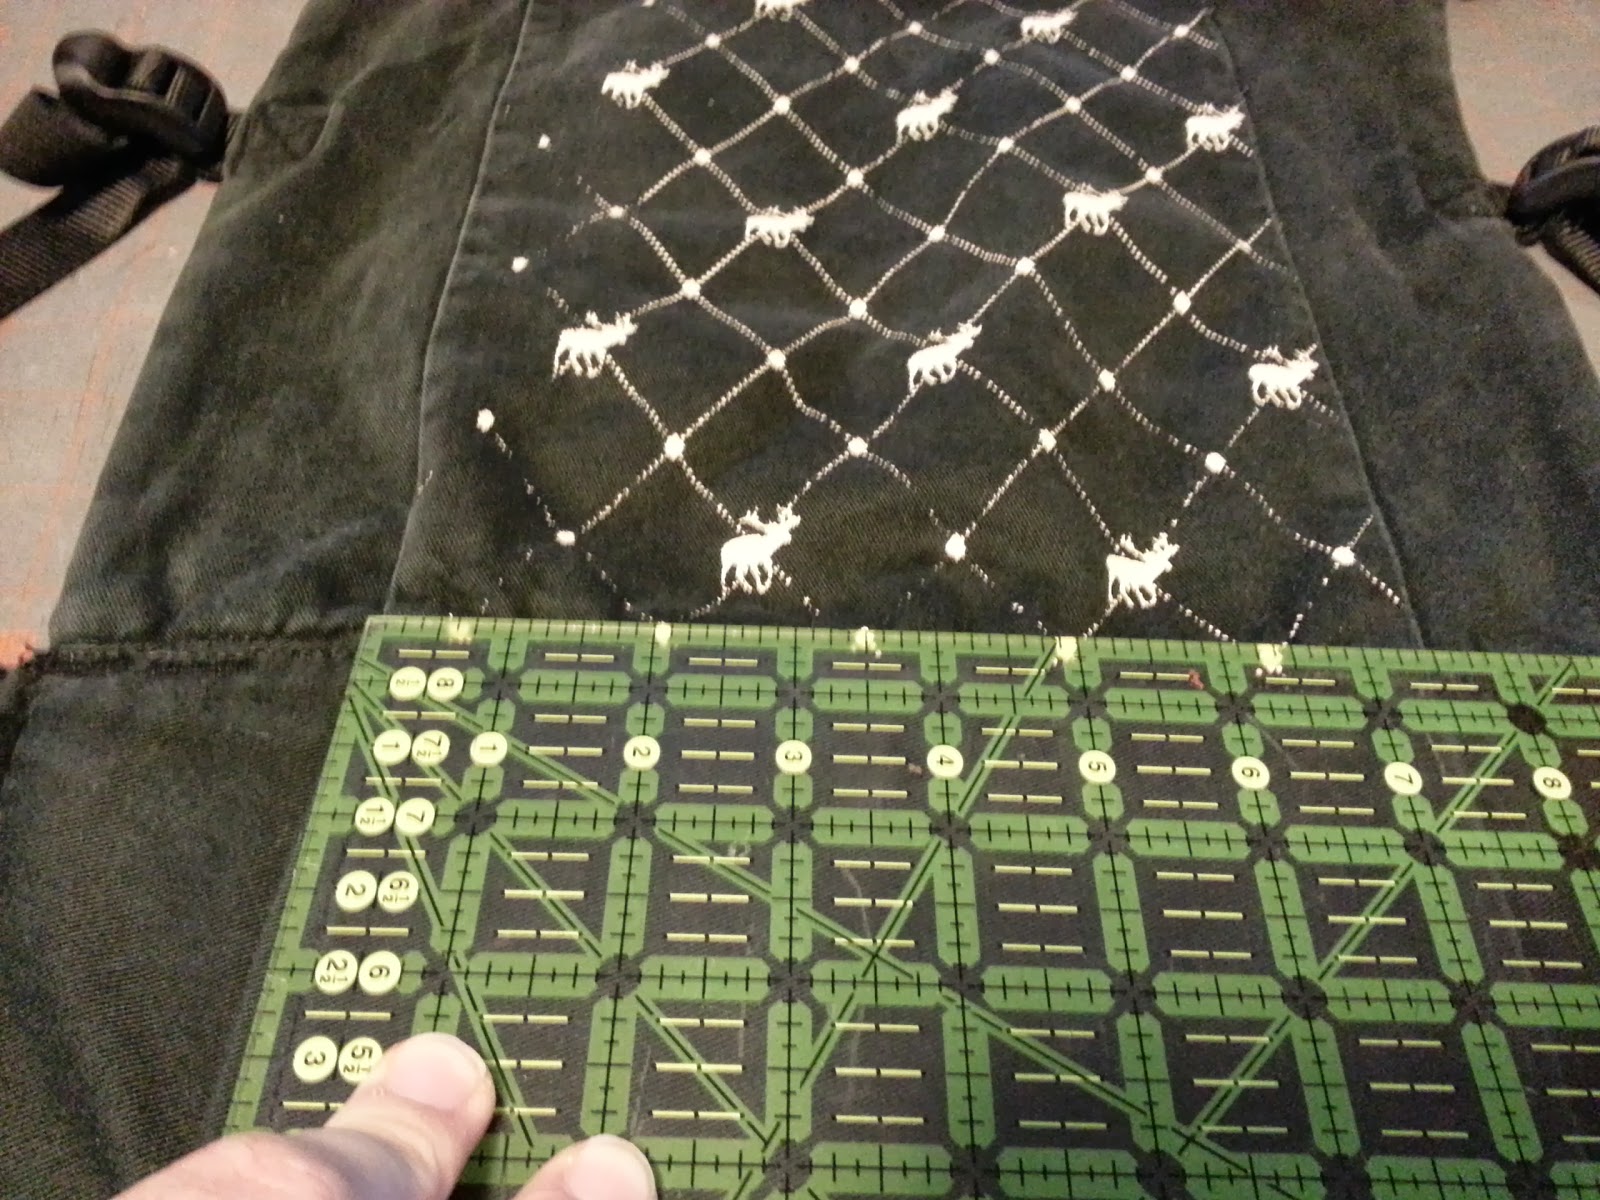
Step 1:  Measure the front panel(s) on your carrier.

This carrier measured 7.5" in width on the bottom section of the panel and 7.75" at the top of the panel.  I chose to use the 7.75 measurement and make my new panel square rather than try to match it exactly. 1/8" on either side does not make a difference.


This carrier has a panel sewn in for snapping on the hood, so I had to keep that intact and recover the bottom and top sections separately.


The tag was also getting in the way in this area.  I did need to use a seam ripper to unpick the TOP STITCHING ONLY so that the tag could move freely.  I did not unpick the tag completely or rip the seam the tag is encased in.


Since the fabric my friend chose to cover her carrier in was very light, you could see through the fabric to the lovely peeling meese underneath.  I had to back the fabric with white in order to completely obscure the pesky moose argyle.

Step 2:  Cut the lining fabric to the exact size of the fabric panels.


Step 3: Cut the cover fabric panels 1/2" larger than the lining all around.


Step 5:  Put the lining and cover fabric right sides together and sew the lining and cover fabric together on 3 sides, leaving the bottom open.

This is a little trickier, considering that one piece of fabric is larger than the other.

Line up on of the sides first and sew, then line up and sew the other side.

Then you will be able to line up the edges at the top and sew across.  You will notice that you have some extra fabric around the edges, that is supposed to be there, just line it up like the picture shows, it should overlap to the edge of the lining fabric.

When you turn it right side out, you will have a nice little trim around the edge of the fabric on the back, which ensures that the lining fabric won't peek through around the edges of your carrier and reduces the bulk a bit around that seam when you are top stitching later on.


Step 4: Pin your new cover panels onto the carrier!


Step 5:  Top stitch around the edges of your new panels.

The top section on this carrier was a bit tricky.  I machine stitched the exposed part on the top, and hand stitched the area on the sides and bottom next to the snap strip.

Don't forget to pin the tag back down and top stitch over it.


Much, much better than peeling moose argyle, eh?

Now go forth and beautify your baby carriers, while I search for the perfect accent fabric for my plain black Ergo...

Tuesday, October 22, 2013

Unseen Scars: Emotional Recovery from Surgery

Nearly 4 years ago I had a gall bladder attack that resulted in having my gall bladder removed surgically.  The surgery was performed perfectly. Physically, I recovered completely.   Physically, I was fine.

Emotionally, I was not fine.  The circumstances surrounding my surgery have made emotional recovery difficult.  You see, my daughter was 10 months old at the time.  My body was so swollen from trying to pass the gall stone that started the attack that surgery wasn't possible until the 5th day that I was in the hospital.  A blizzard started the night that I was admitted into the hospital and lasted for 4 days. My husband is required to work during snowstorms to remove snow from essential roadways around the county.

I am blessed in many ways.  I am blessed with fantastic sisters that came to my home to care for my daughter.  I knew she was in excellent hands while I was unable to be with her.  I am blessed that I had excellent doctors that helped my body heal from the gall bladder attack and surgery.  I am blessed with a husband that takes his work seriously and worked tirelessly to help keep countless people safe on the roads during that blizzard.  Because of the blizzard, schools were closed and I did not have to use sick leave that I didn't have during my hospital stay.  I am so grateful for all of these things.

Each of those blessings has a flip side, and that is hard for me to admit.  I spent so much time trying to feel blessed instead of facing the reality of my emotions while still acknowledging the blessing.  Before I knew it I was drowning in the emotions that I was trying so hard not to feel.   I spent 6 days separated from my baby.  Days full of pain and boredom and medications and strangers and snow, which were spent missing her.  When the storm stopped and the roads were clear enough, my sisters brought Natalie to see me, and she didn't recognize me.  It took her a while to come willingly back into my arms.  That killed me.  After I was home and off of the pain medications I tried to breastfeed her again and she refused.  Over those 9 days, she weaned completely.  Our breastfeeding relationship was over, just like that.  And I died again.  I felt like a failure.  Yet again, my body had betrayed me.  I had already gone through the experience of not being able to pump enough milk for her while I was at work, and had to accept that she would be formula fed while at daycare, and breast fed at home with me.  My breastfeeding relationship with my daughter had been snatched from me, and we had been so close to making it to the one year mark.

While the doctors and nurses were great, the thought of surgery was quite scary for me.  My husband was supposed to drop my daughter at daycare and come to see me at the hospital before I went in to surgery.  I was counting on that support to get me through the scary part, but my surgery was moved up and my poor, tired husband overslept and I went into the OR feeling very afraid and very alone.  I was put under general anesthesia, a first for me, and I went from falling asleep in a relatively quiet OR to waking up in the hustle and bustle of the hospital hallway while they were taking me back to my room, which was very disconcerting and unexpected.  My husband was not in my room waiting for me like I expected.  Ever practical and hardworking, he came to the hospital after dropping off Natalie, they told him I would be in surgery for a couple more hours, and he decided that it made sense for him to go back home and shovel the feet of snow off of the driveway.  You know men, you can generally take their estimate of time to be spent on a job and double it for a more accurate estimate.  He finally came to the hospital to see me 2 hours after I was out of recovery.  Unfortunately, I had been through too much emotionally by that point. I had been alone in the hospital for 4 days, my daughter did not want me to hold her, I went into surgery alone and scared, and I came out of surgery alone and scared.   The rational part of me tried to understand his logic, but I felt very abandoned.  It made me retreat back into myself and put us through a very rocky part of our marriage because I emotionally distanced myself from him.  He didn't understand what I was going through, why I felt alone, why it made a difference whether he had been there or not, why it mattered so much that Natalie had stopped nursing…   It took a long time for us to move forward from that experience and begin communicating effectively and really connecting again.

It has been a long, hard road to emotional recovery, and until recently, I thought that I had recovered.  Right now I am faced with a very real possibility of having to give birth to my twins through a c-section.  The thought of delivering my twins through surgery terrifies me.  For me, surgery has meant separation from my family.  I cannot bear the thought of being separated from my twins through surgery.  Surgery also meant the end of my breastfeeding relationship with my daughter, and I am determined to breastfeed the twins, but worried that the surgery and recovery will prevent that relationship from forming properly like it did with my other children.   The mere thought of having a c-section puts me into tears and makes my heart race, it is a physical reaction to the stress that I cannot prevent from happening.   I watched a video of a very calm and peaceful “natural” c-section that did not separate the mother from her child and I was still on the verge of a panic attack.


I realized that in order to come to terms and have a peaceful birth, no matter whether it is a vaginal delivery or a c-section, I need to face my ghosts from surgery’s past and finish the healing process, since I have only scratched the surface.  Step One is recognizing the feelings that I still have regarding my past experience.  I have found writing this story of my past to share has been a good first step.  These feelings are not something to be ashamed of or hide from others.  Step Two for me will be work through these feelings one by one and come to peace with them, separating my gall bladder surgery from the possibility of a c-section.  Easier said than done, I’m sure.  Plus, I have a deadline.  These babies will come into this world when they are ready, whether I am healed emotionally or not.  Hopefully by that point I will be able to embrace the possibility of a c-section with peace.  Moreover, be able to enjoy the birth of my babies without fear and emotional scars.  

Update 12/12/13:  Let It Go is an update on my journey to recovery from these emotional scars and how they affect the impending birth of my twins. 

Got Twins?


Well, I do!

Talk about the surprise of your life.  Finding out there are two little babies instead of just the one we were expecting is definitely going to be on our list of the top surprises of our lifetime.

We are so blessed and these twins will be the perfect addition to our family.

A brother for Nathan


and a FEISTY little sister for Natalie.


Baby Girl actually kept her parts a secret at the first ultrasound we had.  Then at the second one 3 weeks later, she decided to keep the state of her internal organs a secret as well and wouldn't let us get the pictures we needed for an anatomy scan.  She also loves to push on my GI tract and give me heartburn.  It's a good thing, she will need to be feisty to keep Natalie in check :)  Baby Boy is quite active, but behaves pretty well for a sonogram once his sister stops pushing him around. (Weirdest yet most awesome part of twin pregnancy = watching them interact with each other during the ultrasounds.  I can feel them kicking me, but I can't feel when they are kicking each other.)  They will make their entrance into the world in late February or early March.

Since you are all wondering-
1. No, twins don't really run in my family.  I have an identical twin grandmother, but that is not something that is hereditary.
2. Yes, they are fraternal.  They each have their own little sack and placenta.
3. No, I wasn't as shocked as you might think.  I had very little trouble wrapping my head around the idea of twins.  I love the idea of twins, and that I can get two babies out of one pregnancy ;)
4. Yes, I am well aware that you are quite glad it is me and not you.  I could tell by the way you said "wow" when I shared the news.
5. Yes, I will have to sell my car.  And buy a minivan.  And maybe a bigger house while we're at it.
6. I am in fact exhausted, though no longer nauseous, in pain, growing a bump exponentially faster than my last two, and generally dying.  But I will say that I'm fine, and I might even sound convincing.
7. Despite the fact that I have had this conversation countless times in the last 4 weeks, and it has become a little predictable, I never get tired of talking about my babies and I love that my friends and family and complete strangers are so interested.

I have been hitting pinterest hard looking for the best ways to parent (and craft for) twins.  I think some of these ideas are definitely in my future.  Especially this one


I've got a few things that I've been working on to share, once I find the perfect combination of energy, time, and lighting to photograph them.  I wouldn't hold your breath on that one ;)

Monday, June 10, 2013

Fruits of Labor Infant/Preemie Beanies


When I sew for a cause, I tend to go way overboard and SEW for a cause :)  My local mommies group ran a drive for the Special Care Nursery at our local hospital recently, and these hats were my contribution.  I upcycled t-shirts from my stash of leftovers from t-shirt quilts, and these babies are so fast to whip together it didn't take much time at all.  I used the sleeves of the shirts so that I could use the existing hem and save a step.  I also made them itty bitty and super itty bitty.  I don't know about others' experiences with hats, maybe my kids just had small heads, but all of our newborn and 0-3 month hats were huge on my babies and we ended up using the hospital hat most often for Natalie since it fit her the best. Therefore, the special care nursery hats are super small so they can fit right away, and their parents can enjoy the "fruits of their labor," ha ha.

The concept of the DIY baby fruit hat is not mine, I was inspired by Delia's version of Freshly Picked baby hats and by the Fruit Salad hats made by Maggie of Smashed Peas and Carrots.  They have excellent tutorials to show off the basics of their baby hats.