Wednesday, September 5, 2012

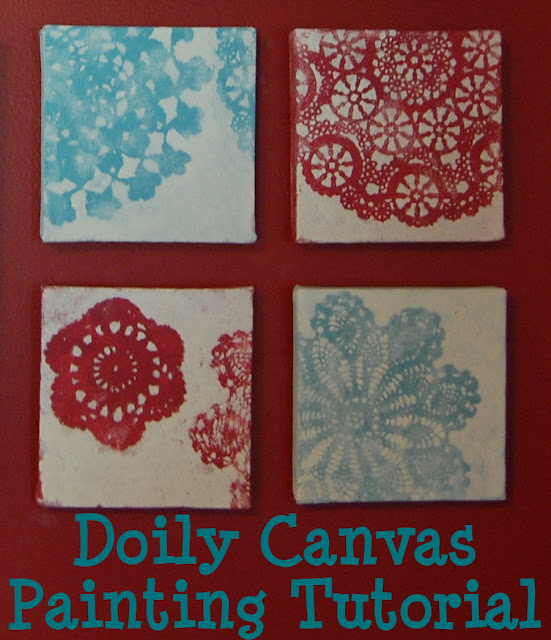
Doily Canvas Paintings Tutorial

I pinned this project on pinterest a long time ago, and I've had the supplies for a long time as well.  I had even had the blank canvases hanging on the wall for 2 months before I got around to actually painting them.  I buckled down and got to it on Monday, since the hubby took Natalie out for the day and I actually had a "vacation" day with just little Nathan.


I did mine a little differently, since I hate spray paint wanted a more rustic, worn look. I used acrylic paints and 5x5 canvases from a craft store.

I started out painting the base coat on the canvases.  I used a dry, stiff brush and painted Xs until it felt right.


Then I arranged my doilies on top of the canvas and painted over them.  I painted the top coat with a dry, stiff brush using a stippling motion.


I wanted the top coat to be thin enough that you could still get a hint of the base coat.  When the paint is dry carefully pull up the doilies and see your masterpiece.


I did two sets for my wall, so here is what other one looks like.


To get the full effect, you should see them on my dining room wall.


I hope you also enjoy the frames that are still sporting photos that are obviously not of my family.  I still have to send pictures to get printed. I started a gallery wall in our bedroom, and half of those frames are hung and still missing pictures as well.

Saturday, September 1, 2012

Happy Birthday Aunt Bri!


My sister just had a birthday a few weeks ago, and while I was thinking about what to make her I thought of a scarf.  Then I realized that I have given her scarves for the last few holidays over the last few years.  We needed a change.  Enter the ever fabulous goodies from Pick Your Plum.  I scored a $30 grab box and everything I needed was inside!  I did an earring and ring set with the white cabochon flowers, and added some pendants.  The owl is my favorite, but the little bird is so sweet too. Happy Birthday Bri! We love you!

Friday, August 31, 2012

Feeling that Itch!


So, I know it's been over a month since I posted anything.  I do have a good reason!  I have been adjusting to my new daycare business.  It's a long long day of keeping lots of kiddos entertained, happy, fed, and relatively clean :)  I've got 5 kids under the age of 3 years old and they are wonderful and hilarious and I love them dearly; however, they are stealing my crafting and blogging time with their adorable shenanigans.  Little Baby Bear here is all the explanation I need.


 What is it about boys and dirt? And now to what's been on my mind.

Every couple years I get this itch, an itch for change.  Not just any sort of change, a big change- something dramatic.  When I was growing up we moved every few years, or sometimes more often.  I think I got used to the change, and I even liked it.  Now we've been in our house for nearly 4 years, and I'm getting an itch.  My wonderful husband doesn't understand it, he is just fine with things staying the same.  He just shakes his head and helps me move the heavy stuff when I decide to rearrange the furniture in every room of the house.  He was slightly less understanding when I stayed up late redesigning my blog, but he conceded when I told him it was a late night or a can of paint.  (Anything to avoid paint!)

I have to say that I am pretty happy with my new look here.  I wasn't quite sure what I wanted at first, then in my googling I found shabbyblogs.com and found everything I didn't know I was looking for- for free!  It was very liberating to redecorate the blog, doing something for me and the blog and satisfying my need for change.  It's really quite powerful, if it's not satisfied by simply watching my baby grow into a little boy in just 8 short months. He's started eating people food, and he loves it so much that he's now scrounging for scraps of food on the floor under the table like a little puppy.  Chances are if he's not climbing up my leg, he's heading over for a meal under the table.

I have two new(ish) projects to share, one of which hasn't been photographed, and I want to do it justice.  I'm not sure of how much I'll be able to craft for a little while, so I'll post when I can.

Tuesday, July 17, 2012

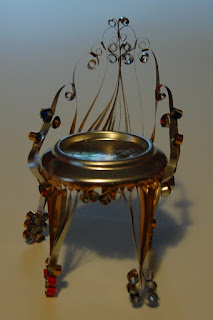
Tutorial: Tin Can Dollhouse Chair


So, this tutorial has been much awaited by google searchers everywhere.  My first post showed my first attempt to recreate the furniture, and it's pretty popular!  I thought it wouldn't be too hard to do a tutorial, but it proved to be difficult to illustrate using photos. (It's not easy to photograph these things, by the way.)  So this tutorial uses a combination of diagrams and photos, but you may need to use some trial and error and imagination along the way.  I hope this can help you quill some tin can doll furniture of your own.

Start with a can.  I used a soda can, which is aluminum and fairly malleable.  I think you can use other types of cans as well, but I would imagine that you would need some nice strong tools if your material is smaller.
I used some heavy duty scissors to cut off the top of the can.  I poked a hole, stuck the scissors in and went for it.
Trim off the curved portion of the can, make it as smooth as you can.  The next step is to mark and cut 1/4" strips around the can.  Your goal is to cut 54 strips total. 

This is where things got a little bit tricky here.  This diagram will give you a better picture of how the strips will be used to make the chair.  They are color coded.

There are only 2 techniques you need to know to make furniture, how to curl the strips and how to clamp the strips together.   The tool that I use is a pair of round nose pliers that are used for jewelry making, easily found at your local craft store.

To curl a strip: Grab the end of the strip with the pliers, twist the pliers away from you to begin the curl.  You can continue to curl the strip with pliers, but I prefer to finish curling up the strip with my fingers.

These short strips are clamps.  They are used to connect strips together when you are forming the chair.

To attach a clamp:  Fold the clamp in half to make a crease, wrap the clamp around the strips, and squeeze the clamp shut with the pliers.
 
Let's make a chair!  We need to start with the chair front, because that is where we get the clamps to make the rest of the chair. 

Step 1:  Cut off about half of the center strips to be used for clamps.
Step 2:  Curl the strips up to the top of the can, twist the curled strips to the side gently.


To make the legs, twist the strips gently to the center.  Gather the strips together and use a clamp to hold them together.  Slide the clamp so that it is about 1 1/2 " from the top of the can.
Use the round nose pliers to curl the ends of the strips out toward the edge.
Then use your fingers to roll up the curl all the way to the clamp.  Repeat for the other 3 legs.
Voila!  You have a chair that can stand on it's own 4 legs.  That was the easy part.

Time to do the back of the chair.  The crazy awesome part that is totally worth it.
Turn the 8 inner strips to the center, and clamp them together.
Curl down the two outer strips down to the clamp.


The next two outer strips will be used later, put them to the side and curl down the next two strip down.

The two strips that were put to the side, are going to be pulled around and clamped to the last two strips in the center.  It will be helpful to curl up the ends before you clamp it up, you can adjust it as needed.  Curl down the two center strips until they touch the touch the larger loops.


Attach the next two strips on the outer edge to the large loop with clamps.

Now curl the edges of the last two strips in,  and clamp the curls together.  It's tricky, keep trying.


Congratulations!  The hard part is over.  I promise.
 We reserved 7 strips for the arm rests.  4 strips get bent up to use for the arm rest, and 3 get bent down and curled, just like the chair front.  Start at the right side of the diagram and work to the left side.  Clamp the two strips together, leave some slack in the rightermost strip to give the piece a nice curve.  Curl down the edge of the rightermost strip.  Clamp the other 3 strips together, curl down the 2 strips on the outer edges.  Lastly, attach the center strip to the chair back with a clamp,  and curl up the strip.


That is it, you're finished with the chair.  I'm sorry if the tutorial is a little rough, but I hope it gives you a better idea of how to make vintage tin can doll furniture.

I will be working on another tutorial for the ottoman, and now that the basics are here, you can get creative and work on your own designs.  If you would like some inspiration, check out my board on pinterest.
Saturday, July 7, 2012

Beautiful Girl

 My beautiful girl is getting so big.  She is so much fun!
 She can sit long enough to let Aunt Bri braid her hair.
And she can really belt out her version of "Once Upon a Dream."

The really special thing about these photos is I didn't make one single stitch she is wearing, ha ha.  That is a rarity around here.

Friday, July 6, 2012

Project Playroom: Part 4 - The Finale

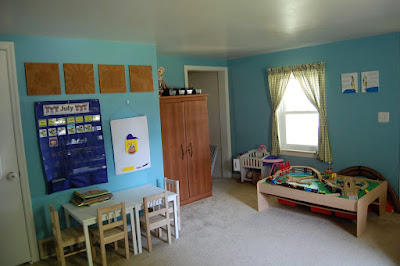
 I have finally finished decorating the playroom!   Here is the last wall.  I caved and instead of making the calendar myself, and bought a calendar pocket chart.   Alongside the pocket chart is our flannel board for telling felt stories. I am so glad this project is no longer looming over my head!  Here is the whole playroom!


Friday, June 29, 2012

Tie Dye Fun


  We had some fun with Sharpies yesterday :)  Natalie said she wanted to do a craft, and I decided it was high time we tried out dying shirts with permanent markers.

 We gathered our supplies first. I had to search 3 locations to round up all these sharpies, and I have a nagging thought that I must have more somewhere that got stashed away when I packed up my classroom and brought it home.  I think teachers might be the top offenders on the most likely to have permanent marker collections list.  At any rate, it only took me one trip to find the rubbing alcohol.  We rounded up some old white shirts and rejuvenated them out on the deck.
I loved it, in case you couldn't tell by my crazy melee of successful and failed techniques on my shirt.  In the end, it's colorful, and even the wonderful husband came home and said that my shirt was pretty :)  Natalie was very impatient to get to the rubbing alcohol bit, so she would make a few dots, or scribble a bit, then use the dropper to make the colors run.  She abandoned me halfway through for her swingset, then came back for some more fun.  Overall, this was fun and very easy and very very gratifying. I'll definitely be trying it again!