Showing posts with label home decor. Show all posts

Friday, July 6, 2012

Project Playroom: Part 4 - The Finale

 I have finally finished decorating the playroom!   Here is the last wall.  I caved and instead of making the calendar myself, and bought a calendar pocket chart.   Alongside the pocket chart is our flannel board for telling felt stories. I am so glad this project is no longer looming over my head!  Here is the whole playroom!


Friday, June 29, 2012

You Are My Sunshine

This project has been ruminating in my head for a while now.  I've been wanting to try my hand at subway art for a while now, and I've been wanting to put something more interesting on the shelf in the kid's bedroom. 

So I had my wonderful husband bring home a piece of aged wood for me, he said he would assemble the sign too.  I was going to take him up on it, but he never got around to it. I finally decided to get out the power tools and do it myself.  I painted it with a brush that was on the dry side so it looked more mottled and distressed, cut out the letters with my Cricut, and used Mod Podge to glue them onto the sign.  The sign's finished dimensions are 11 1/2" x 24" and I'll admit, while my first intention was to hang it on the wall, it is far too heavy for anything like that.  I do love seeing it sitting there on the shelf, especially with our favorite books.

The rest of the kid's bedroom can be seen here if you like to see the before version of the bookshelf wall.

Wednesday, May 9, 2012

Breathable Bumper and a Nursery for Two

 I can count the number of times Natalie got stuck in the rails of the crib on one hand.  She never needed bumpers of any kind.  The first night I moved Nathan into his crib he got stuck in the rails 3 times.  Waking up 4 times in the night is not exactly my idea of a good nights sleep.    I decided we needed a breathable bumper, and two weeks later, I finally got to work on it.  Of course it took two more weeks to get around to photographing the thing.

I didn't take pictures of the process while I was making it, but it is quite easy.  I measured around the inside of the crib, my crib measured around 4 yards.  If your crib is similar to mine, you will need two yards of fabric and 10 yards of bias tape.  With your two yard piece of fabric, I used a gingham because it matches our bedding and it is very thin, trim the selvage and  cut it in half lengthwise.  Sew the two pieces together to make a 4 yard piece. 
 At this point I checked the fabric against the crib and trimmed it down to the correct size and finished the short edges by folding it right sides together and running a seam along the two short edges.  Turn it right side out and get ready to add the bias tape.  You will need two 5 yard pieces of bias tape, one for the top edge and one for the bottom edge. I left 18 inches of bias tape for the ties on either end   Pin and sew the bias tape onto the fabric and you are finished!

While I was at it I took pictures of the rest of the the room since it became a room for two.  You can see before pictures of the nursery here.


 The twin bed we got from my mom when they upgraded my brother's bed.  The duvet is from Ikea, I love how it melds in with the bright colors and ABC/123 theme of the nursery set.
 The bow board on her wall is actually a memo board on a picture frame.


The reading nook, complete with scribbled chalk on the wall.

 As you can see, the room just barely holds all the furniture, lol.


The quilt is my favorite part of the nursery set :)  The drawers are stuffed with clothes from two kids.  I think we need more space!


 Of course the little shelf is just as pretty as ever with all the lovely books we enjoy reading.  I want to make a piece of subway are for the wall above the shelf.


Saturday, March 31, 2012

Project Playroom- Part3

Here is the next wall in the playroom!  The Dr. Seuss paintings are up and the cabinet is organized.  It is full of all the goodies that I acquired during my teaching days.  All I can say is that I'm glad it came with a lock :)
Natalie's favorite toy in the entire room is her train table.  She will play there forever with Thomas and Percy (that is really James) and James (that is really Percy).  She even brings over her toy tools to work on fixing them.  I love listening to her little conversations as  she plays.

Just one project left on the playroom.  I had to put it off to work on Easter outfits for my little bugs.  I can't wait to share them, they will look ADORABLE.

Monday, March 26, 2012

Dr. Seuss Artwork

Remember how I was inspired by this Dr. Seuss poem?


I saw an idea to paint a canvas inspired by a storybook character with the Pigeon painting on a Lemon Squeezy Home.  I thought it would be really neat to turn these illustrations into artwork for the playroom.

Let me just say, I am not an artist.  I really wish that I had the ability, I just don't have it.  But the contact paper method in the Lemon Squeezy tutorial looked like something I could manage.

It turned out pretty good in my opinion.  Of course the hardest part ended up being the vinyl letters.  That was fun.  All in all, I'm rather proud of myself :)

Thursday, March 22, 2012

3D Cork Boards

 I was inspired by this board at Ruffles and Stuff.  I love the subtle interest this adds to the boards, and since they are for the playroom, I went with fun designs (flowers, sun, butterfly, clouds).  Can you tell I've been thinking spring?  Our fabulous March weather has been glorious this year.
 When I was in middle school, gel pens were the biggest craze.  We would draw silly pictures and write little phrases all over our hands and notebooks.  Drawing those butterflies was a specialty of mine.  It makes me smile to think of those days when I see that butterfly on the wall.  It also inspires  me to indulge each of Bug's little fads, both present and future, even when they don't make any sense whatsoever.  It gives me yet another reason to appreciate my mother.  She let us graffiti our hands to our heart's delight because she knew it made us happy :)

Wednesday, March 21, 2012

Project Playroom- Part 2

 Here's a look at the whole wall, our bookshelf piled with ever so many favorite books, and it doesn't even scratch the surface of our children's book collection, and the never-ending selection of fun toys.
 I LOVE these cube shelves.  They make organizing the toys so much easier and the animal bins are so stinkin' cute!  (Bins and shelves were found at Target.)
And our art gallery with Bug's collection of Watercolors on White, and our Valentine's day projects.  The footprint heart is my favorite!  We used stencils to spell the "Daddy I love you" on Natalie's valentine for him.  The wire curtain rods and clips are Ikea again.

I just finished up two more decorating projects for the playroom, and have one more big project left before I'm finished!

Tuesday, February 21, 2012

Project Playroom- Part 1

I've been rearranging my house to get ready for the daycare business.  Mostly doing some superfluous childproofing in most of the rooms, but the playroom is getting the major overhaul.  It used to be the family room, where we had the computer desk, play kitchen, toys and books, and my sewing table/craft area.

I've slowly been transitioning the room over, and it's nearly finished.  Last week I made the final big change.  I moved my sewing table upstairs to our bedroom and the glider down to the playroom.  It was very painful, but unfortunately daycare doesn't mix with sewing machines and scissors.

I've had some major Ikea love while finishing up this room, so please bear with me as I sing their unsolicited praises.


There are no overhead light fixtures in this room.  I have a small lamp sitting on the play kitchen, and there used to be another one on my sewing table, which does not live there anymore.  I needed another light fixture in the room, so I found one that I could mount on the wall.  I covered the unsightly white cord hanging down with a tube of fabric, and I like it so much better.


While I was perusing the wonders of Ikea I also found the clock section.  The nicer clocks were at least $10 and they didn't have a plain white clock with numbers anyways.  Then my eyes fell upon the $1.99 white frosted plastic clocks and I knew I could somehow transform it to meet my needs.

It was so simple to cover the clock in fabric. I took off the plastic face cover, wrapped fabric around the outer edge first and then pulled the fabric into the inside.  I used packing tape to secure the fabric around the inner edge and on the back.  Replacing the plastic face cover with the added bulk of the fabric took a little persuasion, but it holds everything in place quite nicely and looking at it makes me smile :)

Tuesday, August 10, 2010

One Bathroom Down!

So I finally finished the downstairs bathroom! What a project it has been, but I love to look at the new colors! While I desperately wish there was something crafty that could make the brassy gold shower look great, and that we had new flooring in the budget, it makes me happy to walk in the bathroom and see a bright new space!

I didn't take before pictures, but before it was a muted yellow with an awful wooden medicine cabinet above the sink and periwinkle plaid curtains (that we inherited from the sellers and I despised looking at).

So, the bathroom got a facelift. Paint, a new mirror, wall art, curtains, towels and rugs. We also ditched the toilet paper roll on the wall in favor of a tp stand.


Here are the eyesores that I could not fix, but I can live with now :)


There is actually a boarded up hole to the crawlspace under this rug, and the linoleum has seen better days.


The leaky, brassy shower. Every other fixture in the room is silver or brushed nickel, but they chose a gold, brassy shower...

The old ugly fan with the magnetic cap.

The only thing that keeps the bathroom warm in the winter. You should see the sinister heating element that glows bright orange!

I'm so relieved that it's finished (for now at least). Onwards and upwards! The upstairs bathroom is next!

Thursday, August 5, 2010

Busy Busy

I have been plugging away at my summer projects. I decided to start by painting the downstairs bathroom a nice roasted squash/pumpkin orange, which I have been doing for 5 days now during naptime and bedtime. After FOUR coats of paint on the walls and FIVE coats around the edges, I think I FINALLY have all the walls completely covered in orange. After this experience, I have decided that the next time I want to paint a finicky color I will get REAL primer and will NOT listen to the lady that says the primer stirred in the paint will do the same thing. *sigh* I still have to paint the ceiling and trim as well. I can't wait until the paint is all cured so that I can start hanging my new mirror and wall art :)

To take my mind off of the tedium of painting (and to avoid household chores) I decided to start working on Bug's fall/winter wardrobe. I have a ton of fun ideas, but it may take a while to get everything going. I started off with a cute little milkmaid skirt. She can wear it now, but in the fall I can see it being so adorable with some baby legs and a long sleeved top/jacket. I used this tutorial from crafterhours, and I am totally in love with this skirt!


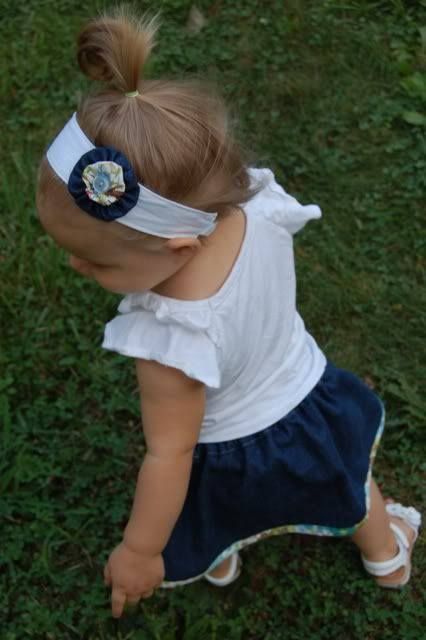
I love how her hands were on her pockets in this one!

And a back view


Here is what will become my first tutorial on my blog! A headband with interchangeable embellishments.


And what good is having a blog if you can't post pictures of your kid just because they looked too funny.


I think Diva Natalie was quite finished with her photoshoot so she gave me the stink eye!