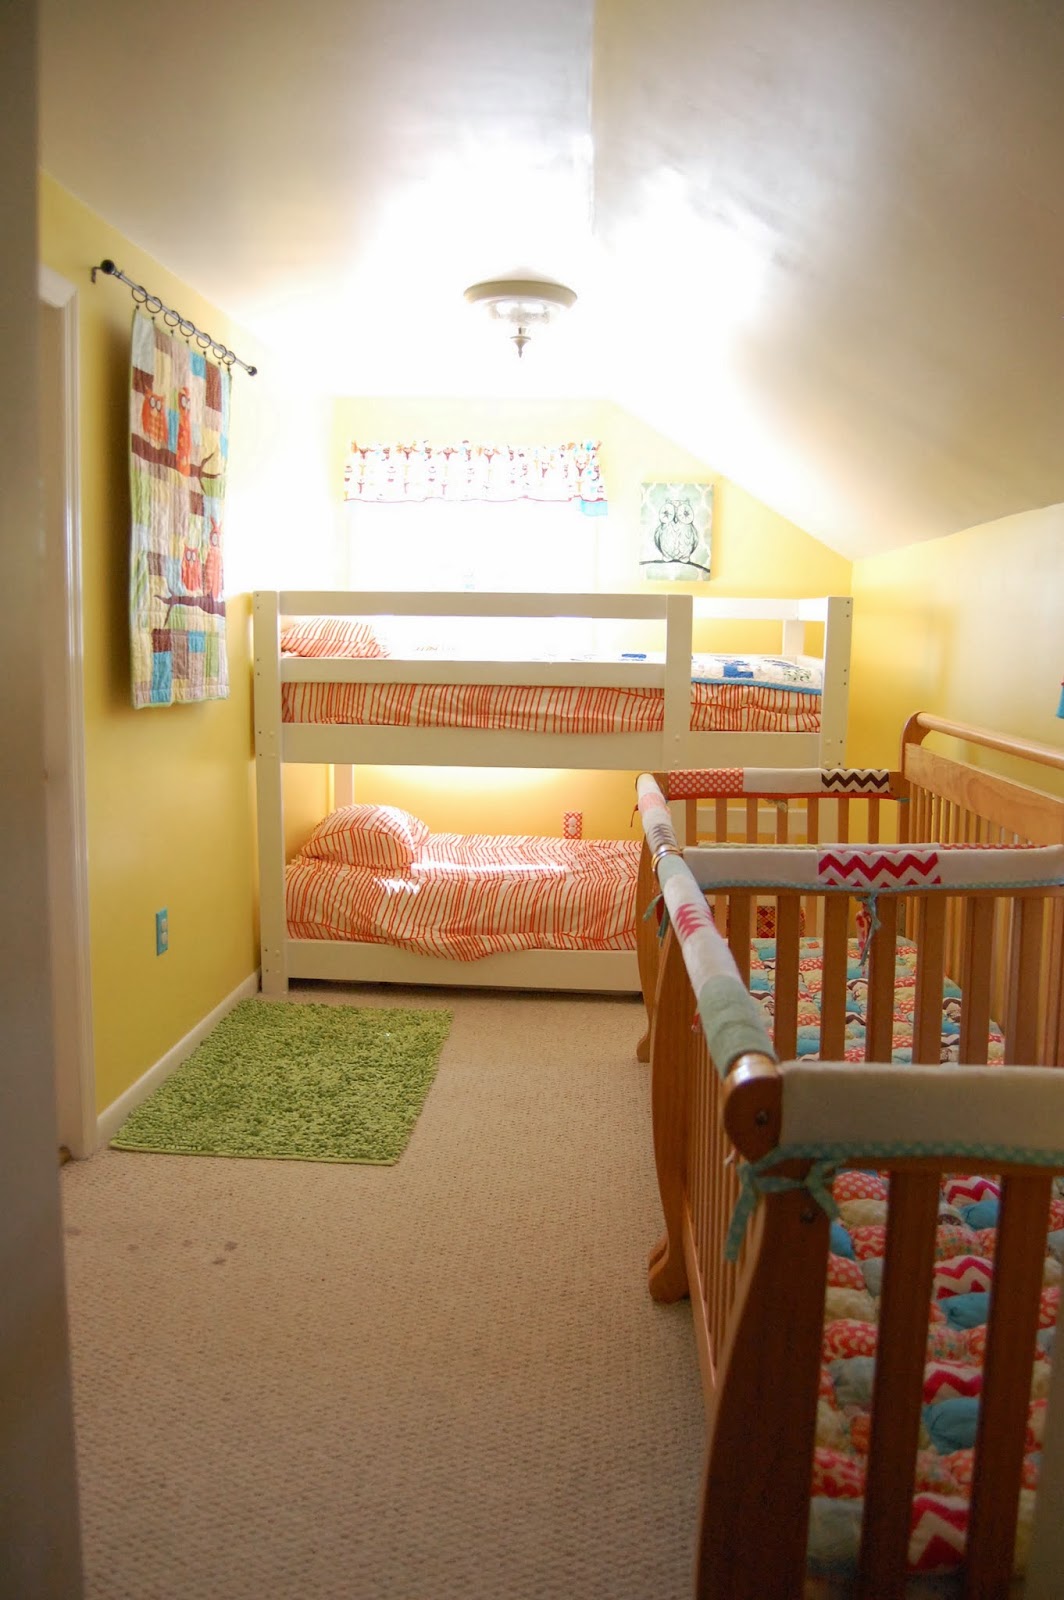
Saturday, April 27, 2013

Owls + Puff Quilt + Diaper Cake = Best New Baby Gift Ever

One of my friends is having a new baby soon very soon, and he just couldn't come into the world without a having dozen embellished prefold diapers/burp-cloths to soil and owlish puff quilt to snuggle on.

I fell in love with these owl prints I found at Joann's (The fabric line is called "Night Owl Club" and I have officially used all that I have.  I am now trying to think of an excuse to buy more!).  Baby couldn't spit up on anything cuter, and I love a good prefold diaper cake. 

  This quilt.  Oh, this quilt was hard to let go.  The puffs are so "fluffly" to quote Natalie, and between the puff and the owls and the soft n fluffy border I just about died.  LOVE, just love it.

I perused the web for tutorials, and ended up getting blogger after blogger referring me to buy the pattern at Honeybear Lane.  Let me say, I'm not usually a "buy the pattern" kind of girl. I usually just wing it.  Two things made me buy the pattern in the end, 1) I was on a time crunch, and it would have taken longer to figure it all out myself. 2) I wanted a quilt just like the ones she makes.

The pattern is wonderful.  I didn't change up too much, but  I did try to accommodate my time constraints. I used the rag puff quilt technique to eliminate the need for binding/backing and extra steps.

The clipping seemed to last forever, but it is awfully cute.  I would recommend not using the ragging technique with the soft n fluffy in the future.  I spent half of my life trying to get rid of all the little threads that stuck to that fluff in the wash.  A normal minky probably would have turned out a little better.  All in all, love the puff quilts. I've already got visions of two more dancing in my heads for friends who are expecting :)

Sunday, April 21, 2013

Princess Dress Up Party


My Natalie just celebrated her 4th birthday!  Complete with self-performed haircut just 2 weeks before the event.  I suppose most preschoolers do it at some point, but still, she cut off all of her hair.


Sigh.  I was totally heartbroken for a few days.  Then I got over the shock that was hitting me every time I looked at her and realized she had grown up.  She wanted to make more decisions for herself.    My opinions and desires do not trump her own.  I've never attempted to force things on her, she dresses herself in clothes that don't match, pink and red are her favorite colors so she looks like a red hat lady half the time :), she plays with whatever toys she likes, and makes plenty of her own choices. I thought I was doing a great job at raising her to be free and independent.  She had asked me on several occasions to cut her hair short, and I would trim it a little bit, loving her long hair too much to cut it all off.  I had tricked myself into thinking that she loved her own long hair, but she actually didn't want it.  She took matters into her own hands, and I have resolved to listen to my strong willed, all grown up, 4 year old daughter.

Anyways,  she wanted a "Princess Dress Up Party" for her birthday, and requested a "down low" Snow White princess dress as her birthday present.  I did my best to make it happen!

 The dress was my first experiment with a peasant style princess dress.  I wanted it to have a very twirly skirt, so I added a circle skirt to the bottom of the peasant top.  It worked out alright, but it does sit a little funny at the waistline.
 It is super twirly! And meets the "down low" requirement as in almost reaches the floor.
 And she loves it!

To make her day extra fun I did a little decorating to the playroom.  Tulle transformed out chairs into thrones.

We made princess cupcakes that I had the kids decorate themselves.

Natalie chose Snow White, of course.
 And promptly started to eat her princess on the cob


She loved the dress, and the cupcakes, and the thrones, and the two dozen balloons hanging from the ceiling, but her favorite thing by far was the cardboard castle.  Now I saw this cardboard castle playhouse and knew that it would be perfect.  When I saw it I fell in love with it, it was so fancy!  Then a couple minutes minutes later I went from "Oh that's really fancy!" to "Oh.  That's really fancy."  It is awesome and amazing, but I don't have room for a huge castle playhouse nor do I want to spend $50+  and hours upon hours of time on a cardboard playhouse that I don't have room to keep up around.  Here is my version of a cardboard castle.   It cost me $5.00, some duct tape, and 3 hours of my time.

 I picked up 2 extra large (22"x22"21") moving boxes and 1 small (16"x12"x12") moving box from Home Depot.  I turned them inside out, taped up all the seams, added the arch using the small box, and then cut out the squares on the top for the battlements, cut the doors, and cut the windows. 

 The structure was still not very sturdy.  I taped squares and triangles of cardboard to the corners of the boxes to act as L brackets and make the structure more sturdy.  Like so


I also taped the castle to the floor and the wall. 


As an added bonus, I left the castle to be a blank canvas for all the kids to enjoy decorating.  Natalie chose to draw long lines representing Rapunzel's hair coming down from the castle.

Happy birthday Natalie!  You are the most amazing, independent, brilliant, sassy, and fun daughter I could have.  Love you to pieces :)

Saturday, February 2, 2013

Book Page Photo Frame

Don't you love it when a project fails initially, but turns out even better than you expected? Around Christmas time I saw this frame on Pinterest.  I fell in love, and thought it would be a fun gift to make.  I actually thought it couldn't be too difficult to do the project as directed with spray paint.  I soon remembered that there is a reason that I stay away from paint in general.  Let's just say I had to scrap the project as a Christmas gift.


I thought on how to save the project for a week or two and ended up thinking about mod podging something onto the frame to cover up the horrendous spray paint mishap.   I love things made from book pages, I even have a pinterest board dedicated to book page crafting projects.  Thinking about making things with book pages in the abstract is easy, it was much harder to cut into the book!  I chose a book I loved as a child, and therefore had read to pieces, literally.  The book was in 4 pieces, merely contained in the cover that no longer stuck to the spine. I tried to start tearing the pages up half a dozen times before I realized I would have to give the book one last hurrah before giving it another life. 


 I finished the last page, returned that portion of the book to it's place in the cover, gave the book one final caress, and proceeded to rip, tear, and mutilate the book into oblivion. The application was simple, I tore up pages in different directions and used mod podge on the back side of the paper.  I didn't seal over the top of the pages with it because I didn't like how it changed the coloring of the paper.  I was able to follow the instructions on the original tutorial to finish the frame with wire and mini clothespins.


I loved the idea of having all of the photos in sepia tones,and while I love it, it is a bit dull.  The next time I update the photos I will try some color!  If I get tired of the color of the frame I may try "staining" it with a color so the words still show through.

Monday, January 28, 2013

Sit tight and hold on!

A new year makes you look back and look forward.  To think about things you have achieved, and things you want to accomplish. I have been simultaneously proud and frustrated with myself about what I have achieved in my life in 2012.  We added a new member to our family,  I had some time with just me and my babies (and a brief affair with this blog), and I started my home daycare.  Those are just some of the big things, things I am certainly proud of accomplishing.  I wish that I had been more vigilant about eating healthy all the time, that I had been more successful with balancing my needs with the needs of my family.  It may be selfish, but I have really been struggling with the lack of time to spend of my crafty projects, and on being able to share them here on the blog.  Blogging is something I truly enjoy, and something I haven't had time to do in months and months.

Last year I thought that 2013 would bring great things for me. I imagined that when Nathan was a year old, I would be able to share parenting duties a little more equally with the hubby and have some time to work on my personal goals.  I went to a 3 hour photography workshop yesterday, something I have been wanting to do for over a year.  It was great, I accomplished a goal for myself.  I was finally able to put together all the disjointed information I had been trying to learn from books and you tube videos and tutorials and learn how to take full advantage of my camera.  Then I walked out of the workshop to my car, and my phone rang.  It was the hubby, asking if I was finished and when I would be back, and could I please pick up some diapers on the way since we only had one left.  He'd had a difficult day, I could tell even though he hadn't said so.  I felt guilty.  I had told myself before I left that I wouldn't feel guilty.  I had told myself all month that I wouldn't feel guilty about leaving the kids with the hubby to do something that I wanted to do.  But I did.  I felt as though I had shirked my duties, been selfish, and perhaps even irresponsible.  Which made me realize that my life had become about making my family's life run smoothly.  "Not a bad thing," I said to myself.  It's my job as a mother and wife to do what I can to make my family happy and content with their life.  They rely on me for that, and when I am not there to make sure that their favorite outfit has been washed for the fifth time that week, they have their mommy milk whenever they want it, and to know where to find all the paraphernalia needed to take the kids sledding, the day is difficult.  I keep my family running smoothly.  That is something I am proud of.  Is that all I can do?  Well, maybe right now the answer is yes.

My days are full. From 7 am to 6 pm, my daycare is open for business. I have anywhere from 4-7 kids running around my house needing me to care for them.  I enjoy it. I love teaching them, and playing with them, and being able to stay home with my own kids to watch them grow.  It is the right move for me right now, it is where I am supposed to be.  It also means I have to spend a ridiculous amount of time keeping my house clean and sanitized, plan lessons and prep activities for my preschool set, take classes and develop myself professionally in early childhood development, and maintain my daycare website, which includes a weekly private blog where I keep parents apprised of the goings on and what their children are achieving while in my care.  Before and after daycare I am still a wife and mother of two small children.  I have one night a week when the hubby relieves me of dinner and kid duty from 6:30-8:00, I need that time for my sanity.  I put up the gate and usually take out my sewing machine, and try not to feel guilty when I hear them struggling downstairs. It is frustrating to be pulled into so many directions, wanting to do so much, but always falling short in one way or another because you just can't do it all.

This morning I read a fantastic post from one of my favorite bloggers.  I felt so happy for her, that she is in a place to start working on new dreams and goals.  Of course it made me think about my own dreams and goals, and then a familiar feeling of frustration came over me.  What about my goals, my dreams? When would I be able to even consider being able to put time into growing my etsy shop, setting up tables at local craft fairs and events, making things and blogging about them?

I first wrote the title of this post "Sit tight and hold on!" feeling resigned.  I had accepted that right now, those dreams and goals are on hold.  I can't work on them right now, but I don't want to lose them.  Right now I have to sit tight where I am at, and know that those dreams will be in my future someday.  However, as I was writing this I realized that despite the fact that I have new goals and dreams I had lost sight of the fact that I am currently living one of my dreams. Staying home with my children has been an amazing blessing.  It surely has not been without difficulties and challenges and I made the mistake of getting lost in them.  I found my way out of the mire of frustration and guilt today.  Instead of feeling resigned I am feeling resolved.  I am going to remember that I am living my dream, and my dream still needs me.   I am going to sit tight and hold on to see where this dream takes me.

Friday, January 25, 2013

My Sewing Corner

I moved my sewing table upstairs to my bedroom about 6 months ago, and I've been working on making that space my own, since my crafting time has been hindered by the fact that children are sleeping just 10 feet away and we don't have bedroom doors.  I either have to move my project downstairs after bedtime and move it back up before my house becomes a daycare again in the morning, or craft in the hour and a half after we eat dinner and before the kids go to bed.  (Which generally happens once a week.)

(This is the cleanest my table has been in the last 6 months, and let's just say there is a reason you can't see the area surrounding the table top...)


My idea for the wall started with the two large embroidery hoops, which I inherited, along with many of the fun vintage looking fabrics I used in the hoops.  I saw this pattern (it is free, but you may need to create a free account to view it) and liked the idea of turning the hoops into more storage for crafting tools.


I thought that the top of the largest hoop looked a little bare, and then I knocked the answer off my table onto the floor.  Magnets. Perfect!  I stitched a 1x 12 grid  across the length of the hoop and slit a hole in the backing at the top of each square in the grid just large enough to slide the magnets into, being very careful not to cut the outer fabric.  Then just slide the magnets in, and voila, instant storage for bias tape makers, needles, bobbins, etc...

The drawing in the frame on the right was done by Bug right after she turned 3.  It is my sewing machine, in case you couldn't tell. I think it is fabulous, and deserves a place of honor on my wall.

I've been making Barbie dresses lately, by the way.  I'm pretty sure Bug will notice Tinker Bell's new dresses hanging on my inspiration board and beg me for them soon, but until then they will grace my inspiration board and make me smile whilst sewing stacks of pink barbie clothes.  I think she picked out almost every single pink print I have when we were looking through my stash for fabric together.  I tried to steer her towards some fun greens and blues, but I was told they "just aren't good for Barbies." I should have known better than to suggest any color that is NOT pink.

I finished off the wall with a couple printables, the ever popular "Keep Calm and get the seam ripper" was of my own creation using their free poster maker site, and adding the vintage sewing machine graphic.  The CREATE printable was found here. I punched up the plain black frames with some washi tape. Love that stuff!

Now that I have my nice, clean, organized, and inspirational crafting corner finished, maybe I will be able to figure out a way to spend more time there.  Not likely in the near future, but I can dream right?

Wednesday, September 5, 2012

Doily Canvas Paintings Tutorial

I pinned this project on pinterest a long time ago, and I've had the supplies for a long time as well.  I had even had the blank canvases hanging on the wall for 2 months before I got around to actually painting them.  I buckled down and got to it on Monday, since the hubby took Natalie out for the day and I actually had a "vacation" day with just little Nathan.


I did mine a little differently, since I hate spray paint wanted a more rustic, worn look. I used acrylic paints and 5x5 canvases from a craft store.

I started out painting the base coat on the canvases.  I used a dry, stiff brush and painted Xs until it felt right.


Then I arranged my doilies on top of the canvas and painted over them.  I painted the top coat with a dry, stiff brush using a stippling motion.


I wanted the top coat to be thin enough that you could still get a hint of the base coat.  When the paint is dry carefully pull up the doilies and see your masterpiece.


I did two sets for my wall, so here is what other one looks like.


To get the full effect, you should see them on my dining room wall.


I hope you also enjoy the frames that are still sporting photos that are obviously not of my family.  I still have to send pictures to get printed. I started a gallery wall in our bedroom, and half of those frames are hung and still missing pictures as well.

Saturday, September 1, 2012

Happy Birthday Aunt Bri!


My sister just had a birthday a few weeks ago, and while I was thinking about what to make her I thought of a scarf.  Then I realized that I have given her scarves for the last few holidays over the last few years.  We needed a change.  Enter the ever fabulous goodies from Pick Your Plum.  I scored a $30 grab box and everything I needed was inside!  I did an earring and ring set with the white cabochon flowers, and added some pendants.  The owl is my favorite, but the little bird is so sweet too. Happy Birthday Bri! We love you!