Showing posts with label kids. Show all posts

Saturday, July 7, 2012

Beautiful Girl

 My beautiful girl is getting so big.  She is so much fun!
 She can sit long enough to let Aunt Bri braid her hair.
And she can really belt out her version of "Once Upon a Dream."

The really special thing about these photos is I didn't make one single stitch she is wearing, ha ha.  That is a rarity around here.

Friday, July 6, 2012

Project Playroom: Part 4 - The Finale

 I have finally finished decorating the playroom!   Here is the last wall.  I caved and instead of making the calendar myself, and bought a calendar pocket chart.   Alongside the pocket chart is our flannel board for telling felt stories. I am so glad this project is no longer looming over my head!  Here is the whole playroom!


Friday, June 29, 2012

Tie Dye Fun


  We had some fun with Sharpies yesterday :)  Natalie said she wanted to do a craft, and I decided it was high time we tried out dying shirts with permanent markers.

 We gathered our supplies first. I had to search 3 locations to round up all these sharpies, and I have a nagging thought that I must have more somewhere that got stashed away when I packed up my classroom and brought it home.  I think teachers might be the top offenders on the most likely to have permanent marker collections list.  At any rate, it only took me one trip to find the rubbing alcohol.  We rounded up some old white shirts and rejuvenated them out on the deck.
I loved it, in case you couldn't tell by my crazy melee of successful and failed techniques on my shirt.  In the end, it's colorful, and even the wonderful husband came home and said that my shirt was pretty :)  Natalie was very impatient to get to the rubbing alcohol bit, so she would make a few dots, or scribble a bit, then use the dropper to make the colors run.  She abandoned me halfway through for her swingset, then came back for some more fun.  Overall, this was fun and very easy and very very gratifying. I'll definitely be trying it again!

Saturday, June 23, 2012

Dainty Dresses: A Really Useful Dress

 This is another project from Natalie :)  We found a pack of Thomas the Train fat quarters at Walmart, on clearance no less :)  Natalie was thrilled and couldn't wait to make something with them.  For a few days, she just played with the fabric itself, being completely happy pretending with it.  Then  when I asked her what she wanted to make, she first said "a horse."  I'm still not sure how to work that one out yet while maintaining my helper's participation, so I kept probing and she said "a Thomas dress".
 We had two of the green fat quarters in the set, and I decided to do a simple pillowcase dress so that she could really do some of the work.  If you would like to make a pillowcase dress, there are a lot of great tutorials, here is one that I like.
 Natalie was able to do a lot of the work with me.  I folded the edges and she pinned the fabric.  I was controlling the pedal on the machine, but we fed the fabric together and she controlled the presser foot and snipped threads.  I kept a constant stream of "first we need to..., this is why we ...., now it's time to..." going so that she actually knows the process herself.
 Thomas and Percy are trembling on their tracks when they glimpse the big slide the naughty Natalie is pushing them toward.
 This dress is her favorite by far, as in she wants to wear it every day and every night.
 I'm convinced that it's because she worked so hard on making it herself.

The fickle nature of the 3 year old is the reason the straps ended up being two toned.  No sooner had she decided on green ribbon for the straps and we had completed threading it through the casings, did she decide she wanted blue instead.  I suggested we do both because I foresaw her changing her mind again.  Isn't hard to pick between two good things?  At least in this case, it works.

Wednesday, June 20, 2012

Crown fit for a Princess

 I'm trying to do more crafts and sewing projects with Natalie these days.  She usually sits at the sewing machine with me and lifts the presser foot, etc...  The problem was that half the time she wasn't really vested in the projects since they were my ideas, not hers.  New strategy- let her come up with the projects.  Brilliant, right?
 Of course, the first thing she asked to make was a crown so she can be "Princess Aurora Natalie" like Sleeping Beauty. 
 We measured her head, drew out the crown on felt (we covered rectangles, triangles, counting, and measuring just drawing it out together :)  We used two layers of felt for stability, and sewed them together near the edge and joined the two ends together.  It was also her idea to decorate it with beads,  She picked them out and told me where to put them, and I really really tried not to influence her choices :)  Before you say choking hazard 3 times fast- all the beads are individually tied and they are on there pretty good.  We would have to really be trying to get one off.
Note:  The enchanting "princess" outfit was entirely Natalie's choosing, and I love it right down to the rain boots :)

Monday, May 28, 2012

Happy Memorial Day!


Wednesday, May 9, 2012

Breathable Bumper and a Nursery for Two

 I can count the number of times Natalie got stuck in the rails of the crib on one hand.  She never needed bumpers of any kind.  The first night I moved Nathan into his crib he got stuck in the rails 3 times.  Waking up 4 times in the night is not exactly my idea of a good nights sleep.    I decided we needed a breathable bumper, and two weeks later, I finally got to work on it.  Of course it took two more weeks to get around to photographing the thing.

I didn't take pictures of the process while I was making it, but it is quite easy.  I measured around the inside of the crib, my crib measured around 4 yards.  If your crib is similar to mine, you will need two yards of fabric and 10 yards of bias tape.  With your two yard piece of fabric, I used a gingham because it matches our bedding and it is very thin, trim the selvage and  cut it in half lengthwise.  Sew the two pieces together to make a 4 yard piece. 
 At this point I checked the fabric against the crib and trimmed it down to the correct size and finished the short edges by folding it right sides together and running a seam along the two short edges.  Turn it right side out and get ready to add the bias tape.  You will need two 5 yard pieces of bias tape, one for the top edge and one for the bottom edge. I left 18 inches of bias tape for the ties on either end   Pin and sew the bias tape onto the fabric and you are finished!

While I was at it I took pictures of the rest of the the room since it became a room for two.  You can see before pictures of the nursery here.


 The twin bed we got from my mom when they upgraded my brother's bed.  The duvet is from Ikea, I love how it melds in with the bright colors and ABC/123 theme of the nursery set.
 The bow board on her wall is actually a memo board on a picture frame.


The reading nook, complete with scribbled chalk on the wall.

 As you can see, the room just barely holds all the furniture, lol.


The quilt is my favorite part of the nursery set :)  The drawers are stuffed with clothes from two kids.  I think we need more space!


 Of course the little shelf is just as pretty as ever with all the lovely books we enjoy reading.  I want to make a piece of subway are for the wall above the shelf.


Sunday, May 6, 2012

Little Carpenter, Cute Dress

 A little over a year ago Robert added shelves to the downstairs coat closet so that I could access and store my fabric and craft supplies effectively. 

  Natalie is his forever apprentice.
  This is also the only record I have of this adorable ruffly dress that I made for her.

 We measured, made marks on the walls.
 Hung up the boards with screws.
 Monkeyed around.
 Got in the way while being adorable.
 I can't believe how much bigger she's grown in just a year.
  And voila!  Completed shelves, with a matching set on the other side of the door.
The shelves are now chock full of fabric and paper and all sorts of fun craft supplies.

Thursday, April 19, 2012

DIY Sticker Mat

What fun is it to have birthday stickers if you can only stick them once?  Bug needed a sticker worthy surface that would let her peel and restick her fun new stickers.

 So I peeked into my closet to do some stashbusting and found a cricut cutting mat that had served its purpose.  It was no longer sticky enough to work properly (which could be remedied with glue materials) and it had gunky corkboard chunks stuck to it (I tried but they are S-T-U-C-K stuck). It had seemed like a waste to throw it away, so I kept it, knowing a day like this would come.  I pulled out some scrapbook paper and had just enough spray adhesive left in the can to glue the scrapbook paper to the mat.
 Then I covered both sides in contact paper and smoothed out the bubbles.
Trim around the edges and voila! a sticker mat for hours of sticking and resticking pleasure.

It seriously took less than 10 minutes from the time that I peeked into my closet to done.  Can't ask for an easier early morning project. (Don't you just love the bedhead? :)

Thursday, April 12, 2012

Cookie Concentration Case Tutorial


We love our cookie concentration game.  However, the gallon size ziploc and construction paper game mat weren't faring too well with all the use they were getting.  Our upgrade is quite fabulous in my humble opinion :)

Materials: Fabric- 2 cuts 11" x 21"
                            - 1 cut 32" x 1.5" or 32" bias tape
                            - 1 cut 11" x 2.5"
                  Vinyl - 1 cut 11" x 8.5"
                   Zipper - 11"
                  Velcro - 1.5" of both sides
                   Embroidery Floss

 Easy way to get vinyl and a zipper- upcycle it from a bedsheet package you have in your stash :)
 1- Take your 11" x 2.5" piece of fabric, fold it in half and sew.  Turn it inside out  (a loop turner makes this easy!) and press with the seam in the center.
 2- While the iron is hot- make your bias tape.  There is a great tutorial on making bias tape here.  Cut into two 11" pieces and two 5" pieces. (Mine is not cut on the bias, while true bias tape that is cut on the bias is better, sometimes it is easier to cut on the grain for some purposes.)  To iron, I folded the fabric in half and ironed it, unfolded it, folded the outside edges to the center crease, ironed them down, then folded the tape in half and ironed again.

 3- Start the game grid.  To make your sandwich, take your two cuts, lay the inner face up, the 11" tube in the center with the seam side down, and the outer face down.  Sew around 3 sides, leaving the bottom open.  Turn and topstitch around the 3 sides, iron again if needed.
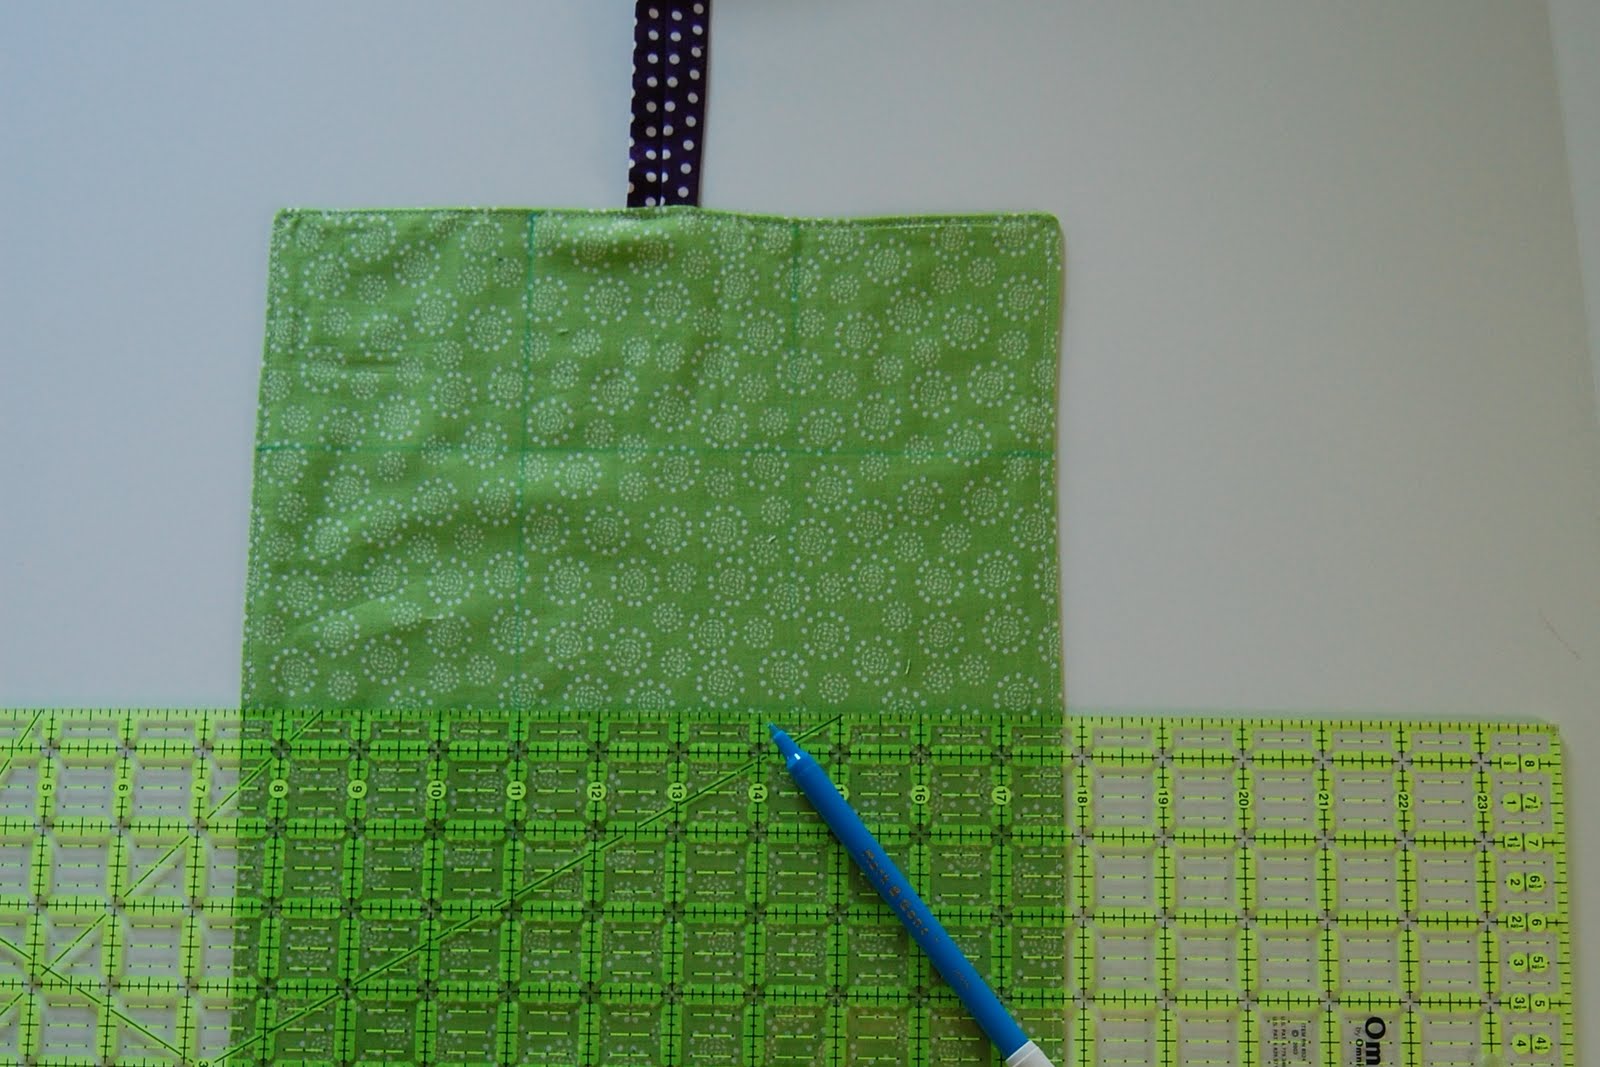
 4- Mark out the 3 x 6 grid.  My lines are 3 1/4" apart.
5- Sew down the lines with the longest stitch on your machine. We'll embroider to define them later.
 6- Start on the case!  Sandwich the vinyl face up, grid face up, zipper face down.  Sew a seam down the sandwich.
 7- Cover the seam with bias tape, pin, and sew.
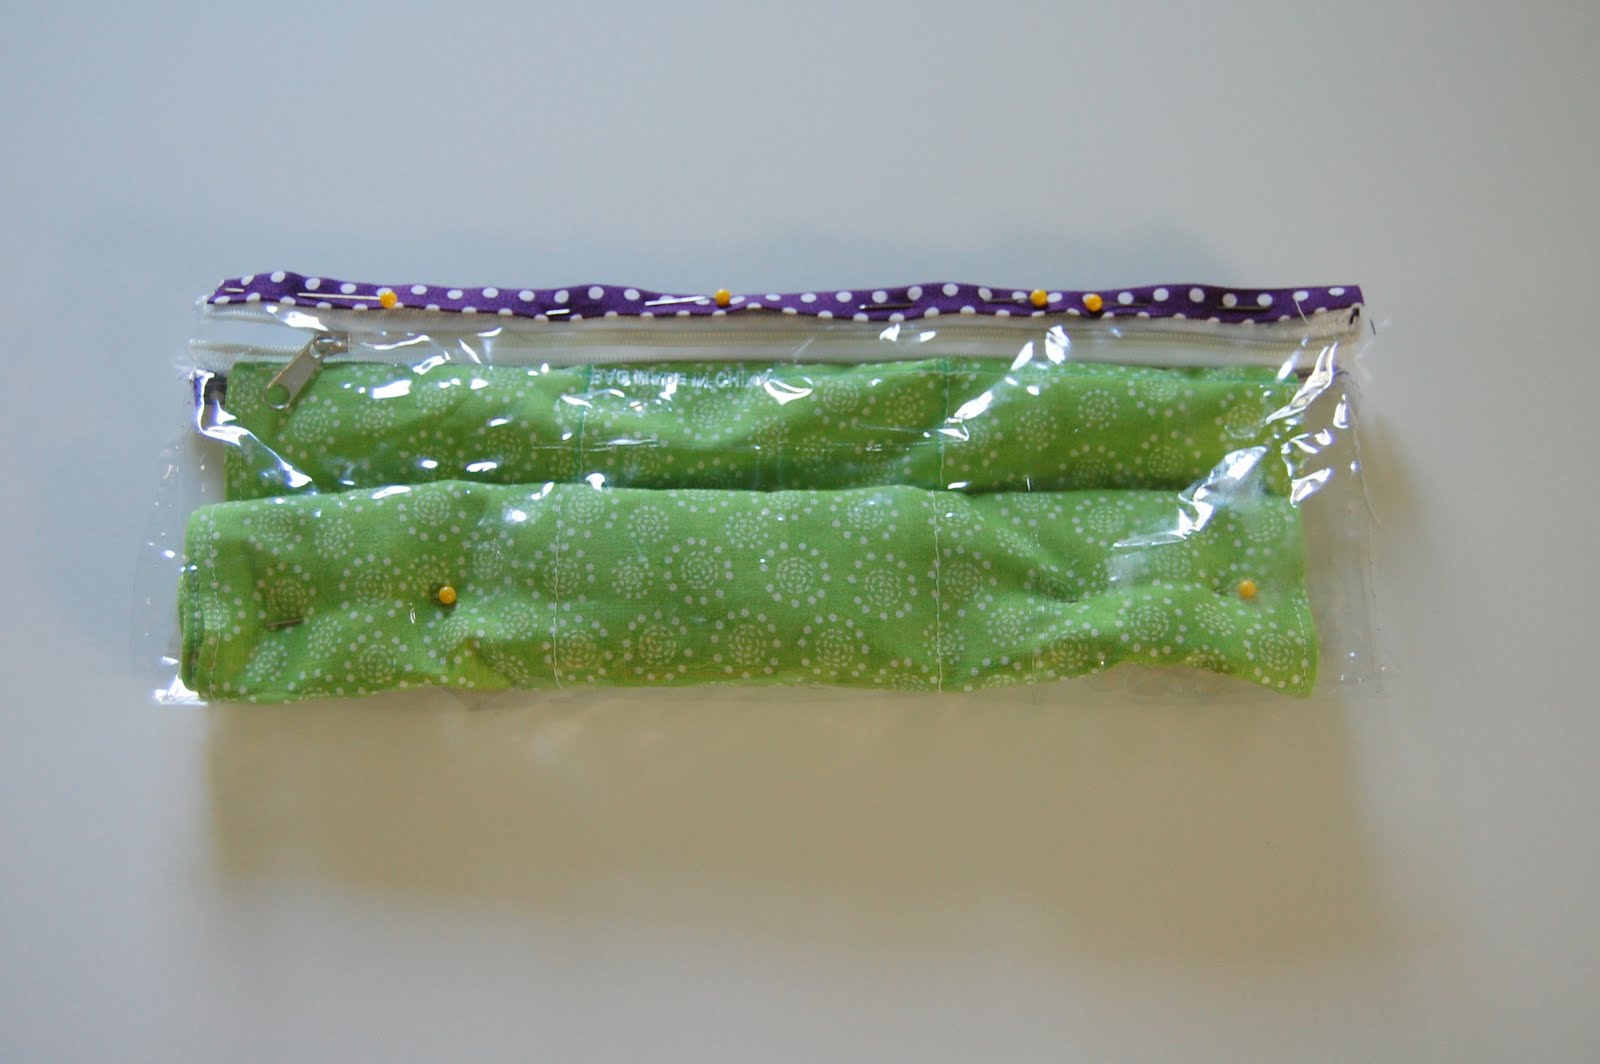
 8-  Roll up the grid and pin.
 9- Fold up the vinyl to the other zipper half, pin and sew.
 10- Cover with bias tape, pin and sew.
 11- Open up the zipper, and turn right side out.
 12- Flatten out the pouch, fold and pin bias tape to the edge, and sew.
 13- Attach bias tape on the other side and you have a case :)
 14- On the tube, fold over the edge two times and pin.
 15- Pin and sew sticky side of velcro to the top over the center seam.  Pin the soft side of velcro to the base of the tube on the opposite side.
 16- Time to embroider the grid! I used a whipped running stitch with embroidery floss over top of the machine stitched lines.

 In short, run the needle through the top of the stitch, pull through, and lather, rinse, repeat.


And TA DA! You're ready to play cookie concentration in style!

 Houndstooth. Grey. Yellow. YES PLEASE!! (I'm keeping this one for me and Bug.)


 P.S.  I think the grid could be equally cute (and less time intensive) using ric rac or other types of embellishment, I just didn't have any on hand in my stash.  If you do want to use another embellishment like ric rac, I would sew it on the grid before making the sandwich for the top, then sew the sandwich as directed to conceal any raw edges.